Sunday, December 20, 2009

car seat strap wraps

Somehow I couldn't manage to spend over $10 on this handy little set of strap wraps, so I made my own in about five minutes with some leftover towelling and velcro. Serge the edges, sew on the velcro and attach to car seat or stroller straps so they don't chafe your baby on the neck! They are washable and absorbent!

Saturday, December 19, 2009

cutting corners


All our lives we've learned that cutting corners means doing a little less than is expecting. But when you are sewing, it's all different. Cutting corners means there's less, but in a good way. There is less bulk, so your finished corners, whether on a bag or garment, are nice and smooth. Hopefully.

Friday, December 18, 2009

katesy makes the cutest little pincushions!

While browsing on etsy one day, I found these sweet recycled pin cushions. Turns out they are made by a creative mama, who has some creative kids as well. You'll want to check out all their shops!
Katesy also has some great bags for play - you can spread them out and let kids play on them and when it's time to clean up, you draw the bag closed! Brilliant!

Thursday, December 17, 2009

violastudio's handmade goodies


So my husband asked me the other day, as I was shopping for gifts for our little guy, "are these toys for you or for him?" umm, well, you see, I uh, guess, maybe, both of us? When you find something this incredible, what can you say?

This is one of the most incredible dolls I have found in all my searching. Her hair is so styley and the outfit! Love the matching ladybug backpack. and the incredible packaging! I love that I can see parts of recycled sweaters in the mix too. Part of me really wants to be young again so I can put this on my christmas list.
Here's the one I would choose for my little guy! All his dolls seem to be girls, even the waldorf babies...

Wednesday, December 16, 2009

three green kids share the gnome love!

I fell in love with these little faces in less than three seconds. Then I read the story. It was totally enchanting. And they are recycled from trees. Nature, recycling and gnomes, three things that I love!

This tiny little gnome comes in his own recycled paper home. Only a child could create such amazing, wonderful sweetness.

Tuesday, December 15, 2009

custom knitting bag for melissa


So here it is. It's a little different than my usual designs, but it was what M wanted with separate sides, chock full of pockets and other features. You can see my notes about the design as we worked it out together, including the dimensions.
There is a sleeve inside to hold a water bottle, a large zippered pocket for a file folder or pattern, a side pocket for a book, soft corduroy pockets along the back and a key hook. On the front, a large pocket and vintage button with an elastic loop closure. On the back, an embroidered knitting basket.
I hope you love it, Melissa!

Monday, December 14, 2009

a winner and another giveaway!

For those of you who love a giveaway, here's a great one! (contest ends 12/15, so get on it!) The ergo carrier has quickly become my husband's favorite baby carrier, and mine too. Thanks to my blogging friends for the heads up!

The winner of the diy tote bag is:
zanekathryne said...
I love the "recycled girls red boiled wool sweater" in your etsy shop, Victoria!

Congratulations! There will be some good sewing adventures coming soon!

Sunday, December 13, 2009

wind an extra bobbin while you're at it!

You are right at the crucial moment when all the pins are removed and you are sewing things together, when you realize that you've been sewing for about 12" without thread!

After this happened to me about a hundred times (probably not an exaggeration), it dawned on me that I could outsmart this system by winding two bobbins. Not at the same time, not like this crazy photo, but you will probably remember now that I showed you this bizarre image. Wind two before you thread up your machine again and you've saved threading time! Or even wind three if you know you'll need them. Then you can just pop in a new one and stitch on.

Here's to more efficient sewing!

Saturday, December 12, 2009

Friday, December 11, 2009

a little giveaway!


This month I am giving away a DIY tote bag kit to celebrate the holiday season of giving and my 100th blog post! Cut from recycled fabric, it has a pocket of Heather Ross' Mendocino Mermaid fabric, one of my current faves!
Winners will be drawn at random and announced on Monday, December 13.
Tell your friends! Tell your friends to tell their friends! Want to get your own DIY tote bag kit? Check out my etsy shop for more. Want to get something already made? There are plenty of bags already done here!

How to win:
1 entry - check out my etsy shops and comment on this post, telling me about your favorite item, whether it's a piece of clothing, an accessory or a handbag.

2nd entry - become a follower of this blog and add a comment.

3rd entry - good karma entry - inspired by my blogging friends! Do something nice for someone else and then tell us all about it in another comment.

Here's a pic of one of the finished totes, to give you an idea of the size and scale:


I'm so excited, I'm looking forward to hearing from you and sharing the goodness that fills my life!

Thursday, December 10, 2009

a little trick for finishing serged hems


Here's a handy little trick for tucking in the serger threads on your projects. Take a large needle with a large eye and slide it into the seam, about an inch or so. Thread the serged tail through the needle and pull it through. If you want, you can repeat to really lock it in. I learned this from one of my sewing friends, and it's been the best solution!


Another way to finish threads is to tie them in a knot, although this works best where they don't show.

Wednesday, December 9, 2009

revamped cashmere and wool sweater

Finally, there was time in the day to make something for myself, something warm, creative, practical and luxurious. The sleeves weren't long enough, so I did some experimentation. The designs worked out well, but I think next time I would open up the sleeve and overlap the pieces, stitching with a straight stretch stitch so they would lie flatter.

Inspired by my friend, Rose, I took out my scissors and made it happen! For the ribbing, I just used pieces from the neck and bottom of other sweaters, folded it in half and serged it right on! When I make the next one, I'll make the pieces a little wider up by the shoulders, so I can wear a shirt underneath without it showing.

The front pieces overlap so there is nursing access!


For the waist, I used the bottom of a brown wool sweater, turned upside down!


A rough little square of olive green finishes it off. Now I'm off to playgroup, baby yoga, or wherever the day may take me. It's so warm and cozy!

Need some wool sweaters? Most of these came from my favorite sweater source, Kris at resweater. She has a shop on Artfire and a fun blog featuring all kinds of creative wool artists. Check it out, there's a sale going on for the holidays! My box just arrived and my sweater stash is restocked for holiday gift making!

Tuesday, December 8, 2009

telephone knitting pattern on etsy!


Now, I'm not a knitter, but I know a lot of them. And this is for all of you who have the patience to work with those fabulous fibers. Something about this phone from caffaknitted just cracks me up! Fyn would probably adore it, and it would be hilarious to see him using it! Or maybe it would a luxe wool phone, done in handspun or variegated Noro? Imagine the possiblities! Now, if only there was a little pocket for my cell phone inside and I could attach it to the front of my diaper bag, that would really be funny, at least for me!

Monday, December 7, 2009

o christmas tree


It's so gorgeous, I felt a little sad to cut it down after it's been alive and growing for five years or so... But, now that it's in our living room, it is so magical. So I thank you, dear earth, for this lovely gift. And I thank my kind friends for a beautiful day! We had fun visiting the tree farm with fyn's buddy, Zebedee and his family.

Sunday, December 6, 2009

holiday cookie bake-off!


One of our visits last weekend was to my cousin's house for the annual cookie bake-o-rama. It was quite the production. I was so sad that all the cookies were made using some kind of milk or butter product... Guess I'll have to get busy making some of my own!

Saturday, December 5, 2009

recycled kid's pants tutorial

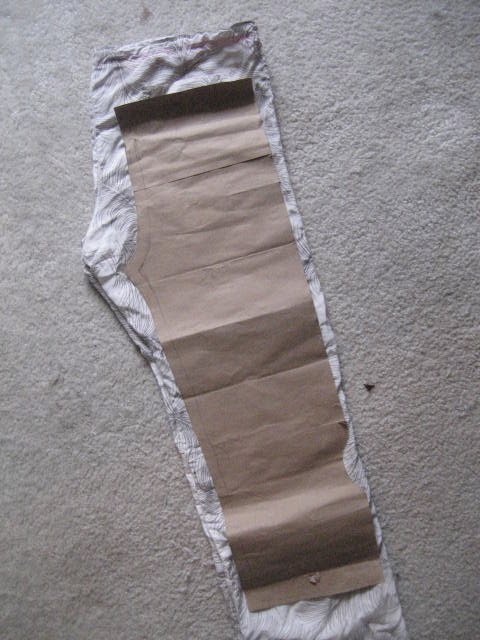
Here's a quick little project inspired by a gorgeous pair of silk pajama pants from one of my friends. They were too nice to retire, but they had some structural issues. And I wanted to try out this new pattern I made by tracing a pair of my niece's pants before I made her a pair with expensive fabric.

Cut out the pattern the fold of the pants. You can use the bottom hem if your pattern fits.

Unfold the pieces and lay them with right sides together. Stitch the inseam.

Now line up the center seams and stitch up the legs.

Fold under about 1/2", and then about 1 1/2", press and stitching, leaving open a few inches to insert elastic.

Cut a piece of 1" elastic that is about 3/4 the size of the waist, or maybe a little less. If you are lucky enough to have your subject handy, you can "try it on" first and then add a little for overlapping.

It's a good idea to make sure that the elastic is flat all the way through, and not twisted.
Overlap elastic ends about an inch or so and stitch a little box.

If you can try them on, now's the time, to see if you need to change the elastic. Otherwise, just stitch the opening closed and voila!


I mailed them off yesterday and now I can't wait to see them on her!

Friday, December 4, 2009

thoughts on waldorf ideas..


At first, I admit it was the little wooly gnomes, dolls, silk scarves and natural wood blocks that appealed to me. For a baby, or a child to interact with things that are natural, real and have integrity of their own is so important to T and me. After reading several books including The Spiritual Task of the Homemaker, The Incarnating Child, Beyond the Rainbow Bridge, Heaven on Earth, You are your Child's First Teacher, Seven Times the Sun and a couple of others, I'm learning so much more. Parenting in this style requires development of the human capacity. I heard that last night on a meditation to which I was listening. Now I'm changing the way I look at things.

It's so sweet to see Fyn caring for his baby yaya, kissing and snuggling her. One night, in a desperate attempt to get some sleep, after a wakeful hour and a half at 4am, I put one baby under each of his arms and asked him to get his babies to sleep. It worked!


Music is also a strong player in the waldorf educational program and I'm also learning to love myself and Fyn enough to sing. In my family, everyone winces when the candles on the birthday cake are lit and it's time to break out the song. We all dive in headfirst, singing really fast and sometimes clapping to drown out our own voices. Now I try to sing a couple times a day with Fyn, and he doesn't seem to care if I'm a little off sometimes. He still wants me to sing "wheels on the bus" again. and again. and again. All this practice makes me thing that my voice is growing and developing too. I'm so thankful for that!

Meditation is another area that is essential on a daily basis. For someone who can hardly sit still, I'm working hard to learn to do this as well. I spent 30 minutes last night stretched out with my feet up listening to a meditation. Ahh, relaxation. Why is it so hard to relax? All this is prompted by a program I found on a website which was sent to me with information for the lantern walk. They have an inner work program called "Be a Beacon" and so far, I love it! There was a great program last night, and there will be more, so I invite all my waldorf friends to join me!

Thursday, December 3, 2009

making kids shirt patterns


Today I found a brilliant tutorial on making shirt patterns, and before I dash into my studio, I wanted to jot it down and share! It's perfect for recycling old shirts into new kids shirts. This one is made from 2 shirts and a piece of fabric from one of my friends. I used the hemmed edges for the sleeves and bottom so it went really fast. For the neckline, I used the ribbing from one of the shirts and serged it on before sewing the lapped neck pieces together and it worked great! It fits really well, although I discovered that it might look better with the lapped part showing in the front.

My friend, Colleen has been asking me a lot of sewing questions lately, and she's the inspiration for this need to share my finds for kids clothes. There must be more moms out there who are sewing, if there are two of us in this tiny corner of Michigan. Perhaps, someday, my book dream will become a reality...

Wednesday, December 2, 2009

my favorite sewing tools


Every once in a while, someone asks me about sewing notions for a new sewer, so I thought I'd share my favorites.

1. magnetic pin cushion with small binder clips

2. magnetic pin cushion with extra long quilting pins

3. spool of craft and button thread with sewing needle (on #2 pin cushion)

4. giant safety pin for pulling elastic through casings (on #2 pin cushion)

5. huge needle for pulling serged ends back in to seams (on #2 pin cushion)

6. ruler

7. aluminum point turner, which is my own design, custom made by my dad, b/c I kept breaking the tiny bamboo and plastic ones or poking through the fabric... let me know if you are interested, since I'm considering adding these to my etsy site.

8. seam ripper (it's new and sharp!). The old one broke when I tried to pick stitches out by holding it sideways. Hmm, I see a bit of theme here...

9. dressmaker shears - gingher and mundial are made by the same company and are my favorites. I had a featherweight ginger that was plastic with metal blades, and, you guessed it, I broke that too, by cutting too many layers of fabric at once.

10. tiny scissors for trimming threads

11. long handled tweezer (not pictured, but essential if you have a serger)

12. compressed air (also not pictured). After many, many machine repairs, I learned that dust is your sewing machine's enemy! and your serger's arch enemy! So, keep them clean and they will work longer.

That's about it for tools that I can think of right now. The other thing you need to know is this sage advice from my gram, whom I loved dearly:

"You might as well get used to pulling out stitches, because you are going to do it a lot. You're going to need to learn to be patient."

Tuesday, December 1, 2009

old kids boot to slipper revamp with wool sweaters

These boots were in a bag of things from a friend. They are a little worn, especially on the bottom, so I decided to convert them into slippers.

Since there's a stash of wool sweater scraps in my closet, it seemed the perfect choice. By holding pieces up over the boots, and following roughly the lines, I duplicated the boot by stitching the sweater pieces together. For the bottoms, there was some "jiffy grip" in my fabric stash, just for this kind of project, I guess. By tracing the bottom of the boot, I was able to get just the right shape. After I sewed it onto the sweater pieces, the tops needed some finishing. The ribbed edges of the sweater seemed like a good choice, so I cut pieces long enough to go around the tops and folded them in half before serging them on. By stretching the ribbing a bit, I was able to get it it roll in over the top of the boots, once I slipped the whole cover over the top. Now I'm working out how to affix the whole outside to the boot on the inside so it won't be slippery. I might have to visit my shoemaker friend...