Showing posts with label tutorial. Show all posts

Tuesday, January 17, 2012

tutorial - maverick zipper repair


This little jacket was a thrift find. It became clear why someone had passed it on, when little f wore it a few times, as the zipper kept separating. I measured the front from top to bottom and bought a separating zipper in the same size. So many people have asked me about replacing zippers, and I had never tried until now. This maverick technique makes it really easy.

Here's the tutorial:


Carefully cut off the old zipper as close to the jacket as possible.


Find a separating zipper that is the same size as the old one or a bit longer if that's all you can find.


Repair any areas where your scissor cut the jacket by stitching over it with a zig zag stitch.


Your zipper will cover this (hopefully!) so it doesn't have to be perfect.


Lay the zipper over the place where you cut off the original zipper and zig zag to the top. Repeat on other side. If your zipper is long, fold it over at the top and stitch it down.


The finished zipper! Maybe not so pretty, but certainly more functional than the old one!

Want to see more maverick repairs?
Let me know what you think!

Sunday, November 27, 2011

another pair of patch pants


Happy Thanksgiving! Hope you all enjoyed a little holiday and had a lovely feast with people you love.

As I review the many things for which I am grateful, I realize that knowing how to sew has shaped, sustained and customized my life, as well as the life of my family and friends. I am so thankful for that! I am thankful for our mother earth and continue to reuse and recycled when I can.

These are the patch pants I made for little f for the harvest gathering at while back. He calls them his harvest pants. They are a bit different from the pants in my tutorial. I used another pair of pants as a p pattern and made the waistband elastic, so he can take them off and on. Would you be interested in learning how to make them?

Saturday, August 6, 2011

cool kid's clothes made from upcycled t-shirts and such


It was this jacket that first drew me to lilygiggle. I was searching for recycled boy clothes. Time passed and I found the site again, with a similar search. Destiny? Must be. Beth makes all kinds of great clothing patterns, and has the cutest little models! Want to stay in the loop? Check out lilygiggle's facebook page and a FREE pattern when you "like" her page.

And right now for you, my faithful blog readers, she is offering a 25% discount in her etsy shop, just use the code REVAMPED until August 13th.

Turns out that Beth is friends with Jay from chickenhill! Wouldn't be great to sew with these girls?


Thanks to Beth for taking time to answer a few of my questions.

How did you learn/who taught you to sew?
Originally I was a self-taught fashion design wanna-be teenager. I had grown up around very talented seamstresses, both grandmas were amazing at it as well as my own mama so there were always sewing machines around. My grandma would take my goofy 8 year old "fashion illustrations" and create the garment just by looking at a child's sketch. One day I just decided I was going to figure out how to sew and made myself pants that I wore all the time even though they were technically sewn completely incorrectly. Maybe that's why I don't mind sewing a bit "out of the box". It's great fun to experiment. Later I was taught to be a proper seamstress at Savannah College of Art & Design while I was completing my major in Fashion Design.

What was your first sewing machine?
An old Kenmore...good machine...wouldn't mind if I still had it.

How did you start upcycling/recycling?
I would love to say it was because I am so sensitive to the environment (which I do try to be) but, honestly, it was out of being desperately in need of a creative outlet after leaving my job and being home with my children. With one income there were just not enough funds to keep myself in lovely fabrics. The local "by the pound" thrift store became my fabric store of choice. I find that much of my creativity has been sparked first by necessity. I think that people who don't think they are creative probably just never really had to be.

Thank you so much, Beth, for sharing your thoughts with us!


Such sweet flowers and a gorgeous photos too.

This serendipity dress is so cool! It is named with one of my favorite words, so how could I resist? I really want it in my size, but maybe I'll have to settle for making one for my niece... The detail on the waistband is so nice and I love the bows, especially since they are purely decorative, so they can be sewn down once tied.


And this is the perfect gardening skirt! You might already know that I adore pockets. All shapes, sizes and in many places. The buttons on top are like the icing on the cake.


Hope you are inspired to do more sewing!

Sunday, April 3, 2011

revamped cashmere sweater


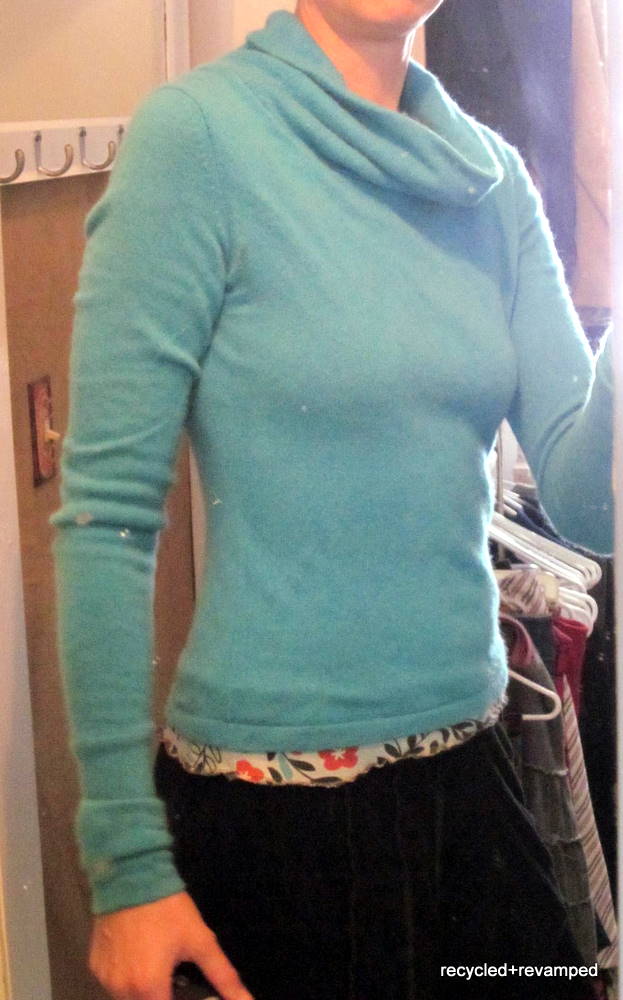
Here it is, finally! The turquoise cowl neck sweater I made a while back. Photos were promised, and life sped along. But, I gave you my word so I had to show you the finished sweater in action. 


You can find the tutorial at my etsy shop. I used two turtleneck sweaters, but I don't think that the existing sweater neckline is that important, since it gets cut off one sweater and only the body and sleeves of the other one are used. I'm wearing it over another recycled tank top tunic that I made a while back.


And look who else wanted their picture taken? He's wearing his wool longies and cashmere elf hat. They look cozy, don't they? He's been wearing the pants for over a year now. I love wool longies! There's a tutorial for those in my shop too.

Thursday, March 3, 2011

a fabulous new book about thrifting, recycling and sewing!


Once in a while you find a book or a person that is totally inspiring. That happened to me recently, when I discovered Jenny and Re-Sew, thanks to my crafty friend Kris over at Resweater who is hosting a giveaway for the book. Soulmates, I'm telling you! How incredible to know that rather than being odd, as I always imagined people thought, there are many more people who love the same things I do and they are all extraordinary! In honor of this realization and to help spread the word about this cool book, here's another giveaway, a tutorial this time. It's inspired by the concept of the book, and is for a sweet little zippered pouch. 


To enter, leave a comment here.
To enter again, become a follower (1st timers only on this round please).
For another entry, blog about it or share it on facebook.
For yet another entry, become a follower over at Jenny's blog, thewildcards.com
And finally, if you buy the book and comment here, you get five entries!

Comments will be open until next Friday, March 11 and will be announced on Saturday!


Everyone who responded will get a copy of the tutorial for the "zippy" pouch!

Wednesday, June 2, 2010

patch pants tutorial featured on etsy treasury!


Ooh, this is very exciting! The patch pants tutorial is on the etsy treasury, Learn Something New! I wish I knew how to share the treasury images with you, but I can't seem to figure it out in the limited time available today, so here the link!

Thursday, March 4, 2010

revamped shirt with wristwarmers tutorial

Here's a fun little tutorial about recycling and revamping a shirt by lengthening a shirt to make it a tunic, adding sleeves to warm your wrists, and reshaping a neckline.

One brown shirt, bearing the logo of my favorite little chocolate shop started the whole thing. The fit just wasn't quite right, and it languished in my closet waiting for inspiration.

The inspiration was this pink striped shirt. It had been attached to a tank top as part of a tunic, but the tank wore out so I cut it off, along with the hem of the sleeve on the chocolate shirt. Cut the wristwarmer section either part of the body or the sleeves of another shirt, adding about 1/2" for seam allowance. These are about 8" long but could be longer or shorter depending on how you like it. Fold the wristwarmer section with the right sides together and sew a tube that is wide enough to fit over your hand. If you are using a shirt sleeve, stitch along the seam to make a tube. The idea is to make sure that the openings in the sleeve and the wristwarmer section are the same size.


Slip the wrong side of the wristwarmer onto the sleeve so they are right sides together. Stitch with a stretch stitch (it looks like a little lightning bolt) or use a serger. Turn right side out and try it on. If it needs tightening, you can turn it back to the wrong side and stitch it again, making the tube a bit smaller.

For the neck, cut the collar off the shirt. Try it on and make little cuts or pin before you cut it out since stretchy shirts look different on your body that when they are laying on your cutting table. The new neckline could be square, v-neck, scooped or asymmetrical.

Cut 1" strips of fabric for the trim on the neckline. If you want a ruffle, stitch down the middle of the strip with the longest stitch length on your machine. Pull one of the threads and gently squish the fabric along the stitching to make either a tight or loose ruffle. Lay trim pieces along the newly cut neckline and stitch with a stretch or zig zag stitch.

For the bottom, cut off the shirt hem and measure the length you want to add. Cut and sew it into a tube that is the same size as the bottom of the shirt. Turn it wrong side out and slip it over the shirt so the right sides are together. Stitch with a stretch stitch or serge.

Tuesday, March 2, 2010

revamped cashmere cowl neck sweater and a tutorial giveaway

mmm, cashmere! After a comprehensive closet assessment, I determined that I needed more sweaters. I headed over to resweater where I lucked out and actually got two of the exact same turquoise cashmere sweater! Here's a preview of my next tutorial...


It also has instructions for adding wristwarmers to the sleeves of the sweater! Can I tell you how excited I am to finally have a sweater that has sleeves long enough to be comfortable? Ooh, it's so deluxe that I wore it for two days in a row! I'm basking in the success of another great revamp, especially after my last t-shirt project, inspired by a Generation T sewing party with my friends. It reminded me why I like to sew things that don't have to fit! Perhaps when I get it worked out, you'll get to see it. For now, I'll be wearing this sweater...

What kind of tutorials should I make next? What do you want to learn about sewing? Leave a comment with the details by March 23 and I'll enter you in a giveaway for a tutorial, and you can become a recycled+revamped product tester. Tell your friends.

Thursday, February 25, 2010

recycled kids clothing tutorial - lined cuffs

Pants too long? Line the cuffs with groovy fabric and roll them up!
Need more instruction?

The mermaid fabric is Heather Ross, one of my favorite fabric designers right now!

Monday, February 22, 2010

recycled sweater tutorial - shawl collar

Recycling is so much fun! After cleaning out my closet, I found some things that needed updating and a few more that need to be added. After shopping with a girlfriend in a couple of fabulous boutiques, I was inspired to make some of my own designs rather than shelling out hundreds for them.
So here's one of the projects:

I found this dress in my closet during my spring cleaning, and decided that it wanted to look less like a nightgown and more like something spectacular, and warm. This great brown sweater in my stash was already felted, and it was just the right color for a collar to make the dress warm and cozy. How to do it? Here you go!

Fold the sweater and layed it under the dress to see how it would look. Figure out how you can make one continuous piece with the sweater you choose. This one was a turtleneck sweater.

Cut the turtleneck off the sweater.

Cut the body off the sweater, just below the arms, and trim the top into a rectangle. Then cut the arms off, making a straight cut rather than an angled one.

Lay the pieces together and make sure they are close to the same size.

Fold the rectangle with right sides together and serge or sew with a stretch stitch.

Slide one of the sleeves into the tube you just made and stitch them with right sides together, being careful not to stretch it too much. Repeat with the other sleeve and turn right side out. If you decide to taper off the end of the sleeve, it's easier to wait until you attach it.

You should have a nice long collar piece ready to be attached. The sleeves had a nice finished edge, so I made that part of the design.

Pin the collar piece inside the dress.

Stitch with the dress on top and collar on bottom. I stretched the collar piece a little, since I wanted to be sure it wasn't loose. Ribbed sweater have a lot of stretch, so you can use them like you would ribbing (like the bottom or sleeves of a sweatshirt). I used a zig zag since it is a stretch stitch. There might be another stretch stitch on your machine which looks like three rows of stitches next to each other.

Here it is! After trying it on, I decided that it would make a better tunic after all, and I cut straight across the bottom. Since it's cotton jersey (like a t-shirt) it won't unravel. And the sweater probably won't shrink if I wash it in cold, but I think I'll try to wash it on delicate with my other wool goodies.

Special thanks to my favorite sweater source, for once again, providing the perfect sweater for my project!

This was another shawl collar added to a long sweater, which I made skinny and cut off the sleeves. It's incredibly warm and comfortable with leggings and a turtleneck!

Thursday, February 18, 2010

repairing denim jeans

While browsing today, I found this great tutorial about mending jeans.
Amy, this one's for you!

Sunday, January 24, 2010

new on etsy - wool longies tutorial

After making several pairs of these for my little guy, I decided to share my version with those of you who are beginning to sew for your babies. You can find the tutorial here.

I added the squirrel and acorns to cover the moth holes in this cashmere sweater.

here's what they look like without embellishment...

You might already know about my favorite sweater source...

Saturday, December 5, 2009

recycled kid's pants tutorial

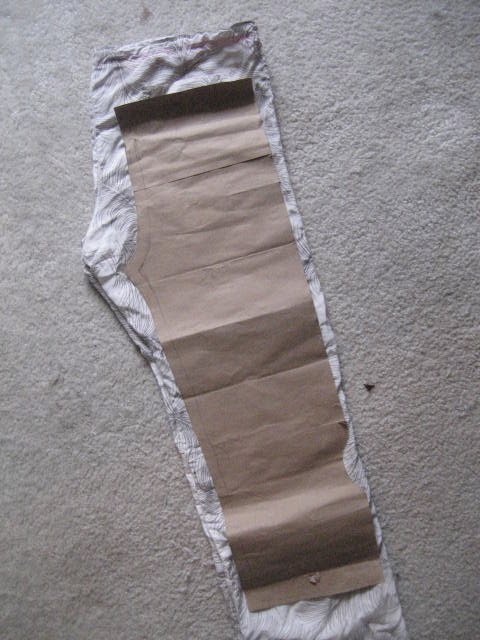
Here's a quick little project inspired by a gorgeous pair of silk pajama pants from one of my friends. They were too nice to retire, but they had some structural issues. And I wanted to try out this new pattern I made by tracing a pair of my niece's pants before I made her a pair with expensive fabric.

Cut out the pattern the fold of the pants. You can use the bottom hem if your pattern fits.

Unfold the pieces and lay them with right sides together. Stitch the inseam.

Now line up the center seams and stitch up the legs.

Fold under about 1/2", and then about 1 1/2", press and stitching, leaving open a few inches to insert elastic.

Cut a piece of 1" elastic that is about 3/4 the size of the waist, or maybe a little less. If you are lucky enough to have your subject handy, you can "try it on" first and then add a little for overlapping.

It's a good idea to make sure that the elastic is flat all the way through, and not twisted.
Overlap elastic ends about an inch or so and stitch a little box.

If you can try them on, now's the time, to see if you need to change the elastic. Otherwise, just stitch the opening closed and voila!


I mailed them off yesterday and now I can't wait to see them on her!